Sunday 28 March 2010

Small...but beautifully formed!

Welcome to another Sunday update. Before I start, I'd like to welcome John Lambshead; our latest follower. Welcome John and I hope you enjoy your stay.

I've not got as many tunnel fighters finished as I would have liked this week. I have only managed to assemble and paint 3 and here they are:

Click the Pic!

The reason there are only three of them is because I have run out of Grymn to convert! I have another bunch on the way from Hasslefree Miniatures so it won't be long before I am back in the saddle. Of the three above, two were used to complete the squad shown below:

Click the Pic!

So I now have forty four Grymn tunnel fighters painted, with at least another ten to go. I reckon that once the new Grymn arrive, I'll have to knuckle down to get them finished before I am distracted by my latest little diversion...

...Speaking of diversions, I was in town on Saturday and happened across some 1/72 scale tanks on special offer. The kits were half price and each box held two models...I thought that they would be perfect for some of the smaller miniatures I own...see what you think:

Click the Pic!

The miniatures in the pic are Kindred; available from Hasslefree Miniatures and the tank is still WIP. To give you an idea of how tall they are, they are mounted on 20mm round bases (not the usual 25mm ones) and they are about 2mm shorter than a Grymn.

Back to the tanks...I bought 5 boxes; a total of ten tanks! all for the princely sum of £15-00! I will end up with a command tank, three tanks with flame-throwers and six tanks with the standard armament. They will be supported by the Kindred; of which I currently own twelve...that will have to change!

On top of everything else, I have bought a few strips of shaped plastic to continue building up the defense robots and have been successful on a few E-Bay bids...not to mention a rather special pre-order that will remain secret until I have them in my hand and assembled...watch this space!

See you through the twitching curtains!

Sunday 21 March 2010

Another Sunday Update

I guess that , seeing as it is Sunday again, I am due to update the blog again...so I won't disappoint and I'll get straight on with it. First up, I have finished another six Tunnel Fighters:

Click the Pic!

Looking at the latest pic, you'll notice that one of them has some blue markings. That is because I have started to work out the squads and which troops will be in which squad. To start with, I have put together my shotgun troops into a single squad; supported by two flame throwers:


Click the Pic!

I just chose blue...because I could! The leader has a few extra blue bits on his helmet because it is easier than Sgt stripes and means I don't have to mess about with different coloured stripes and the like. I won't be marking up any other squads until they are complete so with that in mind, I have to put together a Grymn with grenade launcher before I paint the squad markings on the next squad...it is easier to do them all together so that I get the colours the same.

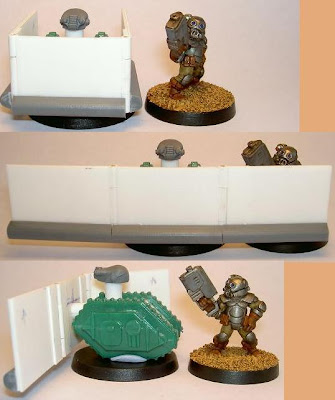
On to other things and the support robot that I showed a little while ago. The idea is that these disposable robots have a fold out wall that is heavily armoured. Once the shield is deployed, the robot trundles forward with the squad of troops following behind the safety of the barrier. That way the squad benefits from extra cover without the restrictions of being mounted in an APC. Here is what I have got so far (please bear in mind that it is still very WIP at the moment):

Click the Pic!

I still have some details to add to the robot's body and some extra armour to add to the front of the armoured shield. The shield itself, is hinged and folds in and out. Just in case people are wondering, the robot's head is made from a GW Terminator head, chopped in half and turned upside-down.

The plan is to have one of these robots in every squad so I'll be building the squad APCs to a size where they can carry the troops and their support robots. I have plans for a more mobile type of robot to act as a comms officer in each squad too...but I haven't got further than that (apart from the thought of it having legs rather than tracks).

Today, while sitting in Tesco's, I started putting together an army list for the Tunnel Fighters using the Void 1.1 rules. I haven't got very far but keep an eye out because once I have got a bit further, I will be posting them on the Grymn blog.

I won't be doing very much more hobby stuff today as I have to do a spot of revision for a short course tomorrow. Yes, it is that time of year where I have to go and put my NBC knowledge to the test and go for a dose of Gas in the respirator test facility! I'm not complaining because I also get a bit of range time so I can put a few rounds down.

That is life in the military for you....mind you, yesterday when I waved off some helicopters I thought how lucky I was to be doing it...I guess sometimes it is easy for me to think that what I do is very ordinary but to most people, preparing helicopters for take off and then seeing them off for flight would appear to be quite out of the ordinary. I guess it is all 'horses for courses'.

See you through the gun-smoke!

Tuesday 16 March 2010

Something out of the blue.

Quite a while ago, a friend of mine sent me a prototype kit for a mobile heli-pad that he had produced from laser-cut plasticard. Here is a bit more information of the original ideas and the creator's assembly of the first kit:

http://brandlin.blogspot.com/2010/01/modular-vehicles-x.html

I finally managed to get my act together and build the kit whilst reviewing it as I went. Here is what I came up with:

The Review.

Just to make things clear, this kit is a PROTOTYPE. As a result, there are areas that have already been reworked...bear this in mind when reading the review.

The kit comes as a sheet of panels that need to be removed. They are cut through most of the way round each piece but there are little tabs that need to be cut to free each part. Removing the bits from the sheet was easy. Doing a quick job of cleaning the pieces was fairly simple (just using a bit of sand paper for the edges) and even though I didn't spend too much time on the clean up, the end result looked OK.

Included with the kit are four magnets, and enough components to make the two hinges that run along the side of the landing pad.

The first thing to notice was the lack of instructions. The reason for this was that the instructions were held on-line in the form of a video...found here:

http://www.youtube.com/watch?v=DkwgTWXDesM&feature=player_embedded#

Not having paper instructions was really awkward for me as my computer is away from my workspace so I had to keep going backwards and forwards. I could really have done with printed or printable instructions to make my life easier. That said, assembly was fairly straight forward (the video may have been annoying...but it works very well ) but assembling/gluing the hinge was fiddly...not insurmountably so, but it took a little bit of careful assembly to make sure that the outer flaps hinged correctly. The end result is great but you must leave everything to dry thoroughly before trying to operate the hinges. Fitting the magnets was very straight forward (just remember to get the polarity right), as was assembling the cab but some of the joins on the cab seemed a bit rustic and after talking to the creator, he has mentioned that the later version has already addressed the problem.

So, overall, the kit went together fairly well and for a first effort at kit making, it is a really well thought out product. I know that there are more kits planned and at some point, they will be available to buy so watch this space for further updates!

Now onto some pix. As you will see, the flaps on the side of the platform hinge up and down. The flier on the pad is the one that the kit was originally designed for...maybe someday, it will get released for sale:

Click the Pic!

Click the Pic!

Click the Pic!

Click the Pic!

See you through the clouds of smoke!

Sunday 14 March 2010

Early Update

I'm not going to waffle today so here is the latest batch of Grymn Tunnel Fighters:

Click the Pic!

That brings the running total to 35...as this pic shows:

Click the Pic!

The next batch has been assembled and is waiting for the Green Stuff to be sculpted:

Click the Pic!

As for the green thing in the last pic, that is an epic scaled Landraider from GW. Who knows what it will become? I guess I do but all will become apparent very soon.

It has been a slow week this week with not a lot going on apart from the tunnel fighter squad. I have managed to get a few bits and pieces for a couple of planned conversions and have been thinking a lot about what to put on my other blog (see Grymn Blog link on the right) but apart from that, fatigue has not been my best friend this week so I haven't been too active.

Hopefully things will change soon and I will fill the blog with goodness!

See you through the tyre smoke!

Sunday 7 March 2010

Sunshine Sunday!

Wow...is it Spring? As I look out of the window and see the beautiful sunshine I could really believe it...even if it is going to be short lived (probably).

All this sunshine got my feet itching so I went to a small Wargame event over at Abingdon today. Called Overlord, it consisted of a couple of halls filled with traders, tables and even a bring-and-buy table. I bought a few little bits and had a wander round...for a small event it was well run and there were a lot of people there. Definitely well worth the visit.

Apart from that, it is my son's birthday today...the grand old age of 14. Of course, what it means is that as a parent, I'm not welcome so I have left him with his mate to watch the football and get on with stuff...

So, Grymn Tunnel Fighters...here's the next six finished:

Click the Pic!

They all have shotguns and are all the same miniature but with differently positioned heads.

The next Tunnel Fighters will be six with pistols. I haven't got any further than cleaning up the parts and chopping off the heads; the assembly will be done over the next few days. After those, I have another five with Pulse guns to build.

Currently, the Grymn Tunnel Fighters have 29 troops all finished...ticking along nicely.

So what else is there to share? Well, E-Bay has been kind to me and I have a nice batch of eleven tanks on their way. They are perfect for my Tunnel Fighter plans but may not be what everyone is expecting...I'm keeping the secret under my hat for now but when they arrive I'll show them off.

Apart from that, it has been a quiet week with not a lot to show off.

Keep watching the Grymn Blog (link over on the right) as I update it fairly regularly. I am still looking for input so if anyone has stuff they want to add...let me know.

See you through the Halcyon Daze.

Thursday 4 March 2010

As promised...

First of all, I'll apologise for the delay with pix but that's life for you...

Next, here's the finished pic of my 'Dress-A-Kev' miniature...with a standard sized human to show how small he is:

Click the Pic!

On to something more familiar...more Grymn Tunnel Fighters. They are still WIP but seeing as they are all assembled and I had my camera out, they were fair game. The pic also shows a bit more progress on the robot:

Click the Pic!

Finally, I painted a miniature a while ago from the Void 1.1 game system. She is Commander X and she is pictured below. The red miniatures below her are more Void 1.1 miniatures and they will be acting as a body guard for her. They are Black Legionaries...even though they aren't black:

Click the Pic!

Yes, I know it is another diversion but if it keeps me painting then it is worth the distraction. I have been waning a bit lately and I needed something to get my painting flow going again...it doesn't help that I am learning the Void1.1 rules at the moment and that means reading all about the troops...I am bound to want to paint some (and these have been in my cupboard for ages).

Well...there you have it.

See you through the kaleidoscope.